Periodic Editor

This editor allows you to set each of the parameters for a single Periodic effect and offers a visual preview the effect's waveform. Below, you will find a detailed description of each element of this user interface and how to use it do design optimal haptic effects.

Magnitude

Range: 0 to 10,000

Units: none (relative to device capabilities)

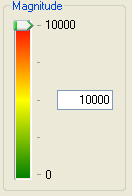
The Magnitude of an effect corresponds to its strength, or the amplitude of the vibration. A magnitude of 0 means no vibration will be felt. A value of 10,000 will yield an effect of the highest amplitude (strongest vibration) the device is capable of. Since different device types have different capabilities and strengths, there no physical units associated with Magnitude. Instead, the Magnitude is simply a scale factor where 10,000 represents the maximum.

Use the Magnitude slider to control the strength of the effect. The slider's channel is color coded in the same manner as the waveform in the Preview Area. Green is for low-amplitude effects, yellow for medium amplitudes and red for high amplitudes (very strong effects).

The valid range for the effect's Magnitude is shown as the maximum and minimum values for the slider.

To enter an exact number, simply type it in the edit field below the slider. The number you enter must be in the valid range.

Period

Range: 2 to 10,000

Units: milliseconds

The Period of the effect specifies the Period of the vibration. The lower the Period, the faster the vibration. For large Period values (slow, pulsing vibrations), the Period specifies the number of milliseconds between pulse cycles. For small Period values (fast, continuous vibrations), the actual speed of the vibration depends on the Magnitude setting as well as the capabilities of the motor.

There are several ways to edit the Period of the vibration. The first is to use the slider underneath the waveform Preview Area. Moving the slider to the right increases the Period of the vibration, causing the device to vibrate slower. Similarly, moving the slider to the left decreases the Period, causing the device to vibrate faster.

The valid ranges for the effect's Period are shown as the maximum and minimum values for the slider.

To enter an exact number, simply type it in the edit field below the slider. The number you enter must be in the valid range. You may enter up to three decimal digits to specify the Period with microsecond precision. The may be unable to achieve every value that can be specified for the Period.

Duration

Range: 1 to 10,000 (or INFINITE)

Units: milliseconds

The Duration parameter specifies how long the effect lasts from start to finish, including the Envelope.

If you do not feel an effect on your device, make sure the duration value is long enough. Minimum durations depend on the actuator in the device that you are using and may be as short as a few milliseconds or as long as 100 milliseconds. The selected style will also affect the minimum duration that can be felt.

To edit the effect's duration, drag this slider left or right. You will notice that the maximum duration value is 10,000. If you drag the slider beyond this point, the duration will become infinite.

You may also type an exact duration value into the edit field below the slider. For an infinite duration, type INFINITE.

To toggle between a given duration value and INFINITE, click the button with the infinity symbol.

Envelope

Range (Attack and Fade Times): 0 to 10,000 (or INFINITE)

Units (Attack and Fade Times): milliseconds

Range (Attack and Fade Levels): 0 to 10,000

Units (Attack and Fade Levels): none (relative to device capabilities)

The Envelope is a means of shaping the strength of the effect in time. The "attack" refers to the beginning of the effect and the "fade" corresponds to the end. The area in the middle of the effect (before the attack and fade sections) is referred to as the "sustain."

During the attack portion, the strength of the effect ramps from the Attack Level to the Magnitude value for the effect. During the sustain, the strength of the effect remains constant at the Magnitude value. In the fade section, the strength gradually ramps from the Magnitude value to the Fade Level.

The Attack Time specifies the amount of time, in milliseconds, for the effect to ramp from the Attack Level to the Magnitude. For example, with an Attack Level of 0, Attack Time of 200 ms and a Magnitude of 7500, the vibration will gradually swell from nothing to 7500 over the course of 200 ms.

The Attack Level specifies the initial strength of the effect. For a vibration that slowly grows from nothing, specify a value of 0. For a sharp attack, use 10,000 for this parameter. If the Attack Time is 0, this parameter is ignored.

The Fade Time corresponds to the amount of time before the end of the effect, for the vibration to ramp between the Magnitude and the Fade Level. The sum of the Attack and Fade Times cannot exceed the Duration. If the Duration is INFINITE, the Fade Time is ignored.

The Fade Level specifies the final strength at the end of the effect's Fade Time. For an effect that fades to nothing, use 0 for this parameter. Even though the term "fade" is used, the fade portion of the envelope doesn't necessarily decay to nothing.

To edit the Envelope's parameters, simply type the desired value in the edit fields.

If the Duration is INFINITE, the Fade Time and Fade Level will be disabled.

The Envelope may also be modified by dragging the handles in the Preview Area.

Style

Values: Strong, Smooth or Sharp

The Style parameter controls the quality of the effect by driving the actuator using different algorithms. In some cases, the difference between styles may not be obvious. In other cases, choosing the correct style may be vitally important to create the desired haptic effect. For example, a subtle vibration that gradually swells and fades will feel very similar in all modes. An effect for a rocket-launcher, however, may feel best with a Strong Style. The Smooth Style is suitable for gentle effects or when an effect requires a soft ending. The Sharp Style may be the best choice for abrupt effects like a machine gun, when you want to accurately feel each pulse of the rifle.

Before making a final decision on the value of this parameter, be sure to try all three choices. You may find that one style feels better than the others for the effect you are designing.

Wave Type

Values: Square, Triangle, Sine, Sawtooth Up or Sawtooth Down

The Wave Type parameter defines the shape of each wave in the effect. For Square, the voltage applied to the actuator jumps directly between 0 to the desired amplitude. For Triangle, the voltage increases linearly up to half the period, then decreases in the same manner. For Sine, the rising and falling edges of the wave look like those of a sine wave. Finally for Sawtooth Up/Down, the voltage either increases or decreases linearly over the duration of the period, then falls/jumps abruptly. The default wave type is Square. The Square wave type is supported by all variants of the , and with all actuators. Other wave types are supported only by the – 4000 Series and higher, and only with high-bandwidth actuators such as piezo.

Although the Square wave type is depicted in Studio as having a 50% duty cycle, the actual implementation may be very different and will use the Style setting to deliver a rich variety of useful haptic experiences. The vibration output from the actuator for any wave type may be quite different from the idealistic, actuator-independent representation in Studio; for example, it is physically impossible for an actuator to start or stop abruptly.

Before making a final decision on the value of this parameter, be sure to try all five choices. You may find that one wave type feels better than the others for the effect you are designing.

Actuator Index

The Actuator Index specifies the actuator on which to play the effect. In order to play the effect, the Actuator Index must be set to an actuator that is present on the current handset. If the specified actuator is not present on the handset, it is displayed as Unavailable, and playing the effect will display an error message.

Preview Area

The waveform described by each of these parameters is depicted in the rectangular area at the center of the editor. This control also includes handles for adjusting the Magnitude and Envelope parameters with the mouse.

The X-axis of this graph represents time. The length of time displayed is equal to the effect's Duration.

The Y-axis represents the strength of the effect. Color is also used to indicate the effect's strength (green for subtle effects, red for very strong vibrations).

The red dot to the far left represents the Attack Level and can be dragged up and down to change the value. Similarly, the dot to the far right of this area represents the Fade Level. It too can be adjusted by dragging it up and down with the mouse. The horizontal line at the top of the effect represents the effect's Magnitude and can also be adjusted with the mouse. The dots at the left and right end of the sustain section control the Magnitude as well as the Attack Time and Fade Time, respectively.

When playing an effect, this graph is animated to visually reinforce the effect you feel on the device.


Immersion and are trademarks of Immersion Corporation.
All other trademarks are the property of their respective owners.
© 2010 Immersion Corporation.
Visit developer.immersion.com for the latest in news and information.