Using this Editor you can modify Timeline effects by inserting and removing Launch Events and exposing the parameters for each Launch Event. Below is a detailed description of each element of this user interface and how to use it to design optimal haptic effects.
To add a Basis Effect to a Timeline, use the mouse to drag an effect onto the Timeline's icon in the effect list, or directly into the Timeline's Editor. When the Basis Effect is added, a single Launch Event will appear at time 0 in the Preview Area.

Note: A Basis effect only needs to be added to the Timeline once. To play the same effect multiple times in the timeline, create additional Launch Events.
A Launch Event is a means of triggering a Basis effect at a specific time. A Timeline may contain multiple Launch Events and multiple Basis effects, but a single Launch Event can only trigger one Basis effect.
To insert a Launch Event, you first need to add the Basis effect to the timeline. When you do this, a single Launch Event will be created automatically. To insert additional Launch Events to the same Basis effect, press and hold the left mouse button on the effect's icon at the left of the Timeline Editor window and drag the mouse into the Preview Area. As you drag the mouse, you will see a dotted rectangle indicating where the Launch Event is to be added to the Timeline, as shown below.
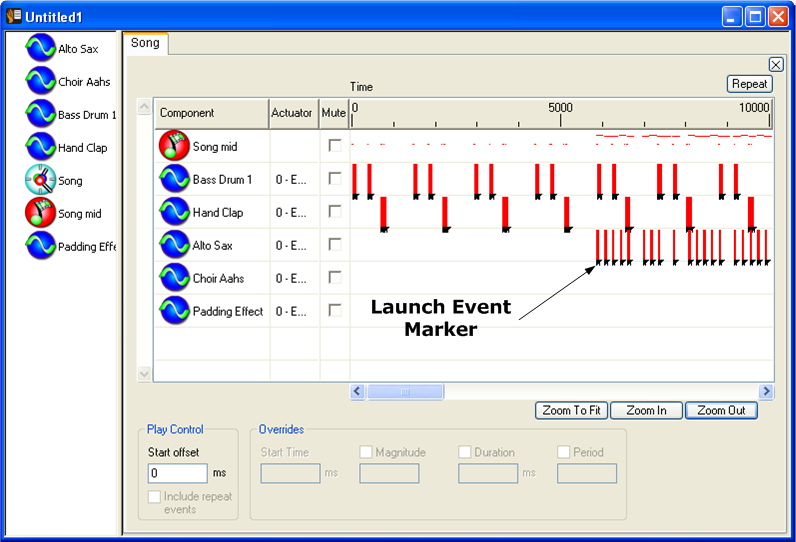
The start and end of of each Launch Event is marked by Launch Event markers. These markers are most useful when there are Launch Events overlapping on the same line. If there are more than one Launch Event on the same line it can be difficult to tell where one Launch Event ends and where the next one begins. Launch Event markers show the start and end points.
Release the mouse button to place the Launch Event in that location. Another way to insert a Launch Event is to double-click the effect icon in the Timeline Editor. This will insert a Launch Event at time 0.
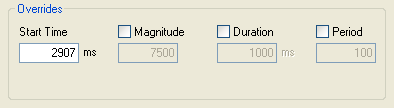
By default, when a Launch Event is triggered, the effect felt will be identical to the Basis effect. However, there are some instances when you may need to trigger an effect with slightly different parameters than are defined in the corresponding Basis effect. This is where the Overrides come in. Each Launch Event may contain a value for one or more Override parameters.
The Start Time is the only parameter that MUST be specified, because there is no default value in the corresponding Basis effect. The Start Time indicates the amount of time that should pass after the Timeline is started, before the Launch Event is triggered. The valid range for this parameter is 0 to 900,000 ms (15 minutes).
To modify an optional Override parameter, select the Launch Event in the Preview Area, click the checkbox beside the parameter you wish to edit and enter a value in the corresponding edit field. The number entered must be within the valid range for that parameter.
To clear an Override parameter and revert back to the original value, simply uncheck the adjacent checkbox. When the Override checkbox in not checked, the value is read-only (grayed-out) and set to the default value of the Basis Effect.
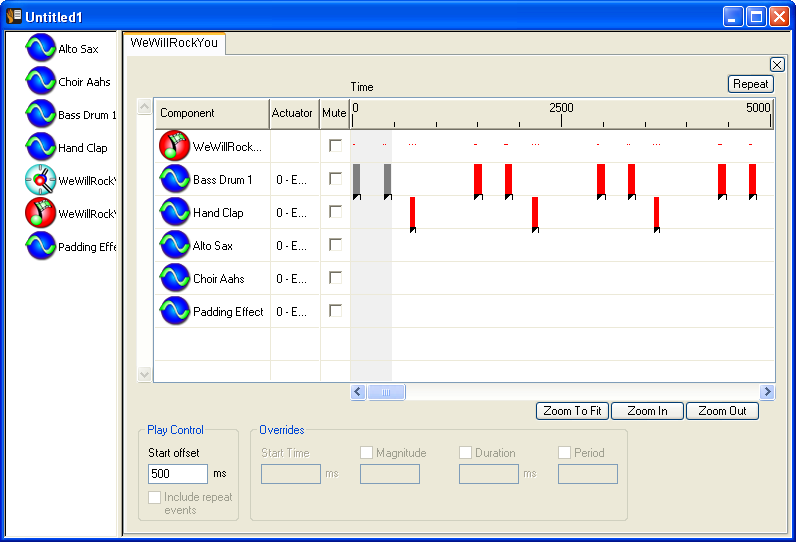
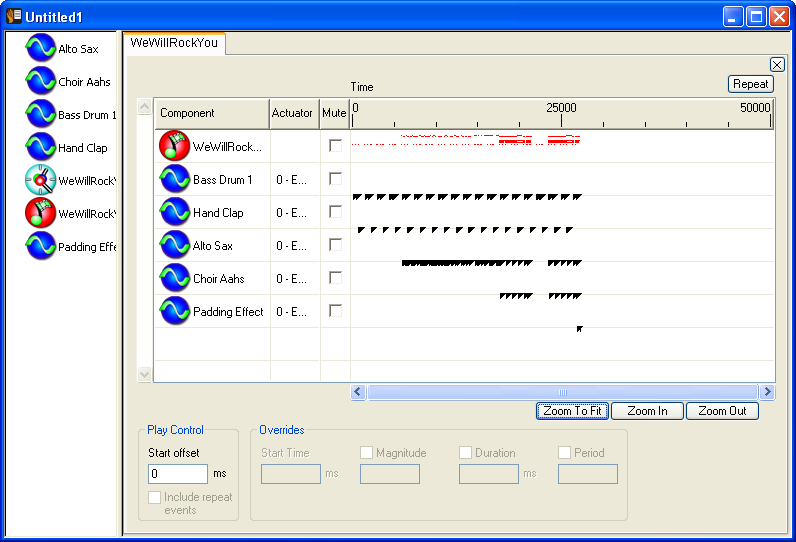
The image below is an example of a Timeline with several Launch Events with varying Override parameters:

|
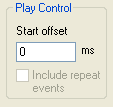
The Start Offset Option in the Play Control section allows the user to specify the point where playback begins. For example, if you are working on a Timeline effect that is 1 minute long, and the section to be changed is at 45s, put the offset to 45s. Each time the Play button is pressed, the Timeline starts to play exactly at the 45s mark. Setting the Offset prevents the Timeline effect from starting at the beginning of the effect each time the Play button is pressed, instead it starts at the desired point. |
|
Where the Start Offset actually begins playing is visually represented in . Where the Launch Event starts is shown in grey (see image below), and the area where the Start Offset begins at 500 ms is shown in white. When the Play button is pressed, the Time Cursor appears at 500 ms and it is possible to follow along visually with the Time Cursor.
Note: If you select both a Start Offset time and Include Repeat Events, what you feel should be correct, however, the Time Cursor may not follow along accurately, especially if you are using nested repeat events.
|
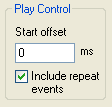
If the Include Repeats option is selected, the Repeat Events are included in the play offset calculation. |
|
A Timeline may also contain Multimedia Objects (WAVE, MIDI MP4, K3G, and SKM files). A Multimedia object is added to the Timeline in the same way as Basis effects. Just drag the Multimedia object's icon in the list view onto the Timeline's icon, or into the Timeline's Editor window.
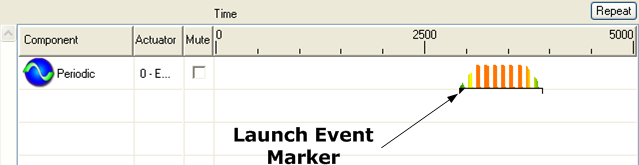
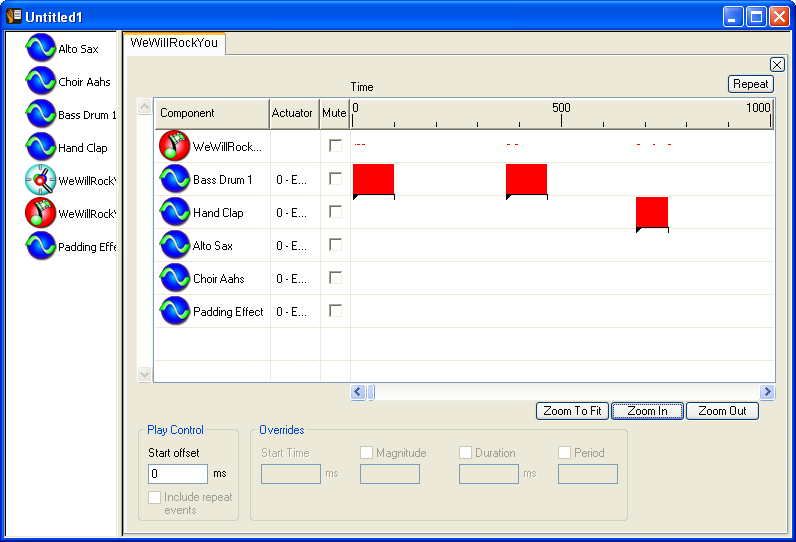
The visual representation of a Multimedia object is different depending on its type. Wave files are depicted as waveforms with the amplitude on the Y-axis as shown below.

For MIDI files, the Y-axis is used to differentiate the instruments within the file. For each note, a horizontal bar is drawn at the Y-coordinate that corresponds to the instrument. The length of the bar is determined by the note's duration.

The Preview Area is the large white rectangle at the center of the editor where the Launch Events are drawn. The main purpose of this area is to provide a visual representation of the Timeline to help you coordinate your Basis Effects, Launch Events and Multimedia Objects.
The Time Bar is the graduated scale at the top of the Preview Area. This bar displays the time in milliseconds, increasing from left to right along the X axis. The Time Bar also displays the location of Repeat Events and the Time Cursor.

One feature of the Timeline's Preview Area is the ability to zoom in or out to the desired level or zoom to fit the Preview Area. Use the Zoom In, Zoom Out and Zoom to Fit buttons to change the amount of time that fills the Preview Area. The scale displayed in the Time Bar will change to reflect the current zoom level.
Zooming in allows you to view the Timeline at the desired resolution in milliseconds.
Zooming out gives you a greater view of large sections of the Timeline. You can zoom out far enough to see the entire Timeline.
Zooming to Fit zooms to show all of the effect. If one or more effects in a Timeline are selected, only the selected effects fill the screen.
Each Launch Event depicted in the Preview Area has "handles" that allow you to manipulate some of the Override parameters with the mouse.
To display the handles, select the Launch Event by clicking on it with the mouse. The Launch Event will become highlighted as in the image below.

The Start Time parameter simply be clicking and holding the mouse button on the center of the Launch Event and dragging it from side to side.
To adjust the Launch Event's Duration, use the mouse to drag the right edge of the event, making it longer or shorter.
The Magnitude can be changed by dragging the blue arrow at the right edge of the event.
You can also select multiple events and change them all simultaneously. To select more than one event, hold the control key <Ctrl> and click the left mouse button on each event you wish to select. With several events selected, you can change the start time of the entire group by dragging any one of the selected effects from side to side. Similarly, you can adjust the Duration and Magnitude of all selected effects by dragging any of the Duration and Magnitude handles, respectively.
To unselect an event, hold the <Ctrl> key and click on the event a second time. To unselect all events, click anywhere in the Preview Area that is not occupied by an event.
To remove events from the timeline, simply select them and press the Delete key.
Basis effects target a specific actuator on handsets that have more than one actuator. The Basis effect editors have an Actuator Index field to specify the actuator on which to play the effect. For convenience, the Timeline Editor has an Actuator column in the Preview Area that displays and allows the user to change the Actuator Index for the Basis effect in each track.
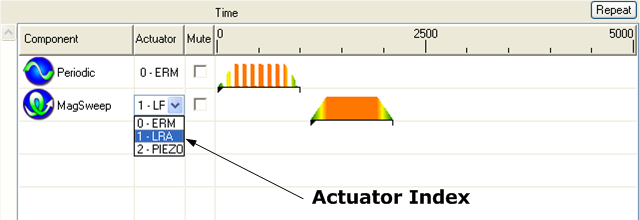
The Actuator Index for a Basis effect in the Timeline Editor changes the Actuator Index for that Basis effect regardless of how the Basis effect is played or how it is used. The changed Actuator Index will be shown in the Basis effect editor. If the Basis effect is part of other Timeline effects, the changed Actuator Index will also be shown for that Basis effect in the other Timeline effects.
Note: The number of available actuators depends on the device that is selected in the Device Dropdown from the Toolbar. If the chosen actuator index for any given track does not correspond to an actuator on the chosen device, then the actuator for that track will be labeled as "Unavailable". When one plays a timeline for which certain tracks are mapped to "Unavailable" actuators, then such tracks are not going to be played on the device. In terms of the this behavior corresponds to opening a device handle for multiple actuators via OpenCompositeDevice(...). However if one opens a device handle to a single actuator using OpenDevice(...) instead, then a different behavior is to be expected when playing the timeline on this device handle: all tracks are merged and played on a single actuator.
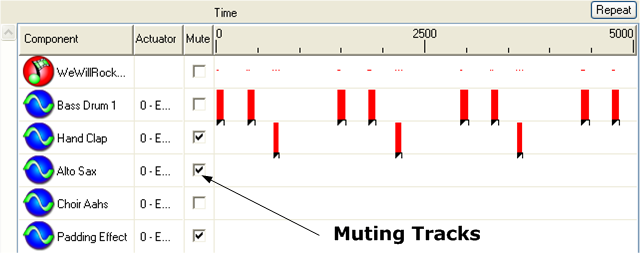
It is possible to mute one or more tracks in a Timeline. To mute a track, click the checkbox next to the component to be muted. When the Timeline effect is played, all components that are checked are muted.
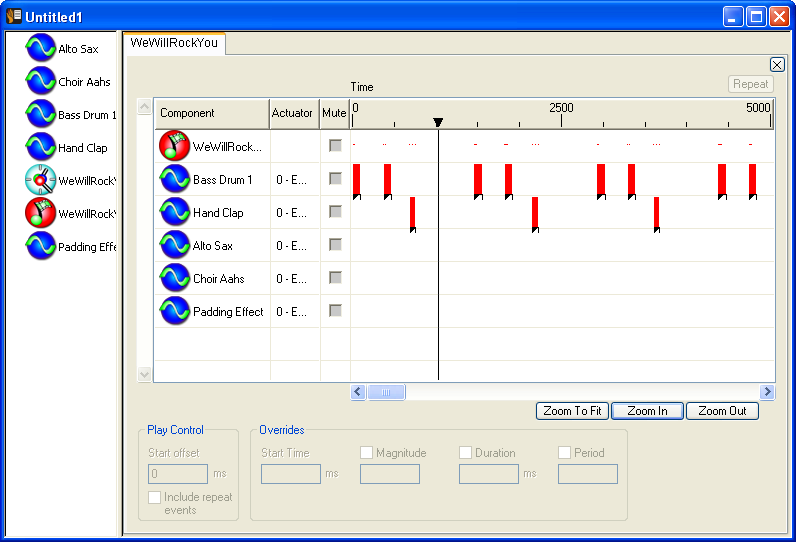
The Time Cursor consists of a triangle displayed in the Time Bar and a vertical line in the portion of the Preview Area where the Launch Events are drawn. This cursor indicates the current place in time as the Timeline is played.
In this image, you can see the time cursor as it approaches a Launch Event that is aligned with a note from a MIDI file.
A Repeat Event is similar to a repeat bar in a musical score. When the end of an active repeat section is encountered, the Time Cursor jumps back to the beginning of the repeat section. Each Repeat Event has a count associated with it. The count specifies the number of times the Repeat will be taken before playback continues to beyond the End-Repeat bar.
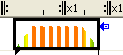
To insert a Repeat Event, click the Repeat button just above the Time Bar. This will put the Time Bar in insert mode. As you move the mouse left and right, you will see the begin-repeat symbol moving in the Time Bar. Position the begin-repeat symbol at the beginning of the section of the Timeline you want to repeat and press and hold the left mouse button. The begin-repeat symbol is added to that location and an end-repeat symbol appears. Now, while holding the left mouse button, drag the end-repeat symbol to the end of the section of the Timeline you wish to repeat. Release the mouse button to drop the end-repeat symbol into place.
You will notice a "x1" beside the end-repeat symbol. This indicates the count, or the number of times the repeat will be taken.
Note: Repeating a section once means it will be played twice.
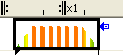
This illustration shows a Timeline that repeats the section between 0.5s and 2s. When you play this timeline, you will feel "Periodic" play twice followed by "MagSweep."

Once a repeat is added, it can be moved around in the same manner as the Launch Events. First, select a Repeat Event by clicking on one of its handles (the start- or end-repeat symbol or the count, i.e. "x1"). To move an entire repeat section, click and drag the begin-repeat symbol. To make the repeat section longer or shorter, click and drag the end-repeat symbol. The repeat count can be edited by clicking on it and typing a new value on the keyboard.
You may find instances when you need to "nest" Repeat Events. A nested repeat event is one that is contained within another Repeat Event.
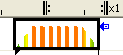
This illustration shows a nested Repeat Event. When you play this Timeline, the effects you feel will be in this order: Periodic, Periodic, MagSweep, Periodic, Periodic, MagSweep.

When a Timeline is playing, the active Repeat Event will be highlighted in red.

There are several special considerations to keep in mind when using Repeat Events in a Timeline:
|
1. |
You may nest repeats up to four levels deep. The Editor will not allow you to insert a Repeat Event in a location that is more than four levels deep, nor will it allow you to create a Repeat event that spans a forth-level nested repeat, or any other situation that could cause the total number of nested repeats to exceed 4. |
|
|
2. |
Repeats sections may not partially overlap. That is, a nested repeat must be completely contained within another repeat. |
|
| 3. |
It is possible to have two repeats with the same start time. In this case the shorter repeat is considered to be nested within the longer repeat. |
|
|
4. |
In some instances, an effect may extend beyond the end-repeat symbol. In such cases, the effect felt is NOT truncated. It will be felt in its entirety even though the time cursor takes the repeat in the middle of the effect. Here, the effect will be felt TWICE, because the beginning of the Launch Event occurs inside the repeat section. |
|
|
5. |
In other cases, an effect may begin before the repeat section and end somewhere within the repeat. Here, the effect will only be felt ONCE, because the beginning of the Launch Event occurs outside the repeat section. |
|
|
6. |
Unlike Launch Events, only one Repeat Event may be selected at a time. |
|
|
7. |
Repeat Events cannot be inserted or modified while the Timeline is playing. |
|
|
8. |
Sections of Multimedia objects (WAVE, MIDI and SKM files) do not repeat with the Launch Events. So, if you are trying to synchronize the haptics with a particular audio file as it plays, you may want to avoid using Repeats. |
|
Immersion and
are trademarks of Immersion Corporation.
All other trademarks are the property of their respective owners.
© 2010 Immersion Corporation.
Visit developer.immersion.com
for the latest in
news and information.